The kitchen transforms when the scent of thinly sliced onions hitting hot oil begins to waft through the air. It is a savory, sweet, and slightly smoky aroma that bridges the gap between a high-end steakhouse side and the comforting soul food of a Sunday afternoon. I remember the first time I encountered these wispy, golden tangles; they were piled high atop a perfectly seared ribeye, glistening under the dining room lights like spun gold. That first bite offered a shattering crunch that gave way to a delicate, mellow onion flavor, instantly elevating the entire meal from a simple dinner to a culinary event.
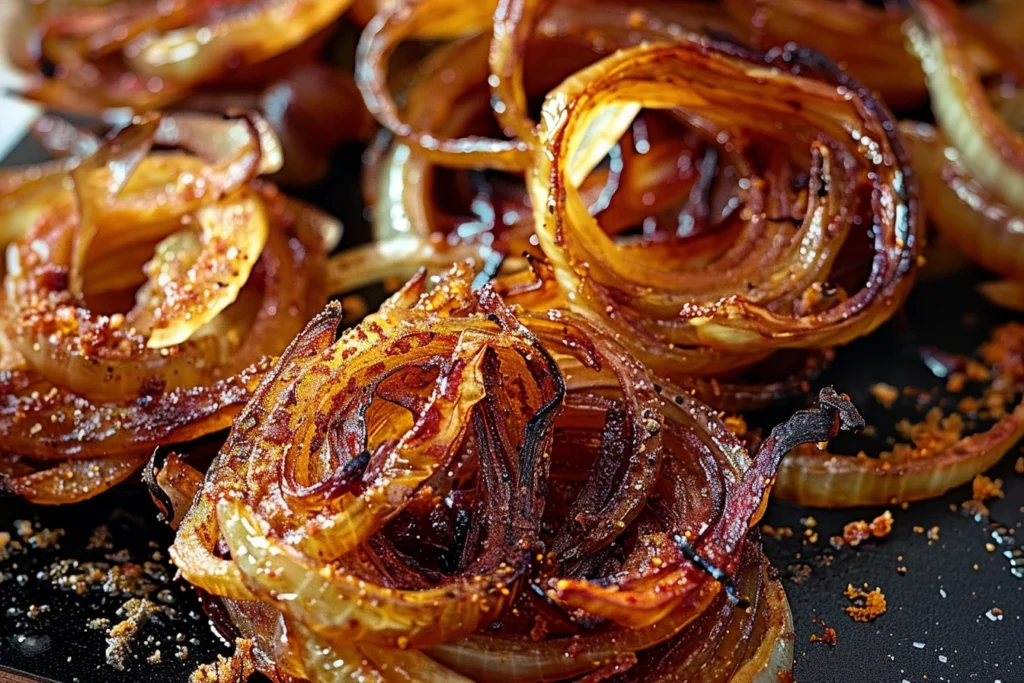
For many home cooks, achieving that specific “tobacco” texture—so named for its resemblance to dried, shredded tobacco leaves—feels like a professional secret guarded by executive chefs. There is a nostalgic magic in the way these onions curls and crisp, reminiscent of summer fairs and backyard barbecues, yet they possess an elegance that fits a formal holiday spread. It is the kind of dish that disappears from the table before the main course is even carved, leaving guests scavenging for the last stray golden threads at the bottom of the bowl.
What truly makes this recipe a staple in my kitchen is its ability to turn a humble, everyday vegetable into a conversation piece. Onions are often the supporting cast, the aromatic base hidden in a sauce or a stew, but here they take center stage. This narrative of transformation—from a pungent, raw bulb to a crispy, addictive delicacy—is the essence of great home cooking. Whether you are serving these as a topping for a juicy burger or as a sophisticated garnish for a vegetarian risotto, the result is always the same: pure, unadulterated satisfaction.
Why You Will Love This Dish
Unmatched Textural Complexity
The primary reason this recipe will become a permanent fixture in your repertoire is the incredible “shatter-crisp” texture. Unlike standard onion rings which rely on a thick, bready batter, Tobacco Onions utilize a delicate dusting technique. This creates a coating that is impossibly thin yet remarkably durable. Every bite delivers a high-frequency crunch that contrasts beautifully with soft proteins or creamy mashed potatoes. It provides that essential element of “mouthfeel” that professional chefs use to balance a plate.
A Symphony of Balanced Flavors
While the texture is the star, the flavor profile is deeply layered. By soaking the onions in buttermilk, we neutralize the harsh, sulfuric bite of the raw onion, replacing it with a subtle tang. The addition of smoked paprika and garlic powder to the flour dredge introduces an earthy, savory undertone that mimics the complexity of slow-cooked dishes. It is a profile that is salty, slightly sweet from the natural sugars in the onion, and subtly spiced, making it compatible with a wide array of cuisines.
Versatility Across the Menu
These onions are the ultimate culinary “chameleon.” While they are traditionally paired with grilled meats, their utility extends far beyond the steakhouse. They add a necessary crunch to soft tacos, provide a salty contrast to a rich mac and cheese, or serve as a gourmet alternative to croutons on a fresh Caesar salad. Because they are quick to prepare and use inexpensive pantry staples, they are the perfect way to add a “wow factor” to a meal without requiring hours of labor or specialty ingredients.
What Makes This Recipe Special
The difference between a soggy, greasy onion and a true Tobacco Onion lies in the science of moisture management and temperature control. Standard recipes often skip the soaking phase or use a heavy wet batter, which results in a product that loses its crispness within minutes of leaving the fryer. Our method focuses on a high-surface-area-to-volume ratio, ensuring that every single strand of onion is individually coated and flash-fried.
This specific technique employs a buttermilk soak, which serves two purposes: it acts as a mild tenderizer and provides a lactic acid “glue” for the seasoned flour to adhere to. By using a very fine, seasoned flour dredge instead of a batter, we allow the moisture to escape rapidly during the frying process. This prevents the onions from steaming inside a thick shell. The result is a lighter, airier, and more refined garnish that maintains its structural integrity even when placed on top of hot, moist foods. Furthermore, we emphasize the “tobacco-thin” slice, which is the technical hallmark of this dish, ensuring the onions fry in seconds rather than minutes.
Ingredient Essentials and The Science of Flavor
The Onions: The Foundation
For this recipe, large yellow or white onions are preferred. Yellow onions have a higher sugar content than white onions, which aids in the caramelization and browning process. The science here involves the Maillard reaction; as the onions hit the hot oil, the natural sugars and the proteins in the buttermilk react to create that deep, golden-brown color and complex savory flavor. If you prefer a milder, sweeter result, Vidalia or Walla Walla onions are excellent seasonal alternatives.
Buttermilk: The Secret Weapon
Buttermilk is essential for two reasons. First, its acidity breaks down the cellular structure of the onion just enough to make them flexible and less pungent. Second, the viscosity of buttermilk ensures that the flour sticks in a thin, even layer.
- Substitution: If you don’t have buttermilk, you can create a DIY version by adding one tablespoon of lemon juice or white vinegar to a cup of whole milk and letting it sit for ten minutes. For a vegan alternative, use soy or almond milk mixed with apple cider vinegar.
All-Purpose Flour and Spices
The flour acts as the desiccant, absorbing the surface moisture and creating the crisp exterior. We season this flour heavily because the onions themselves are quite mild.
- Smoked Paprika: This provides the “tobacco” color and a hint of woodsy smoke without the need for actual smoke.
- Garlic Powder: Adds a baseline of umami that salt alone cannot provide.
- Gluten-Free Option: You can easily swap all-purpose flour for a 1:1 gluten-free flour blend or rice flour. In fact, rice flour often results in an even crunchier texture due to its lower protein content.
The Frying Medium
A neutral oil with a high smoke point is mandatory. Vegetable or canola oil works best. Avoid olive oil, as its low smoke point will cause it to break down and impart a bitter flavor at the temperatures required for flash-frying.
The Masterclass: Step-by-Step Narrative
Phase 1: The Precision Cut
The first step is arguably the most important. You must slice the onions as thin as humanly possible—think 1/8th of an inch or less. A mandoline is the best tool for this, but a very sharp chef’s knife and a steady hand will suffice. The goal is to create long, wispy ribbons. Once sliced, separate the rings manually. This increases the surface area, ensuring that the buttermilk and flour can reach every nook and cranny.
Phase 2: The Softening Soak
Submerge the onion ribbons in the buttermilk. Do not rush this step. Let them soak for at least 30 minutes. You will notice the buttermilk begins to take on a slightly yellow tint; this is the harsh onion juice being drawn out. Common Pitfall: Using too little buttermilk. The onions should be completely swimming so they can relax and absorb the moisture.
Phase 3: The Dredge and Shake
Working in small batches, remove a handful of onions from the buttermilk, letting the excess drip off. Toss them into your seasoned flour mixture. Use your fingers to “fluff” them, ensuring they don’t clump together.
- Visual Cue: The onions should look dusty, not pasty.
- Pitfall: If you dredge too many onions at once, the moisture will turn the flour into a thick dough, and you will end up with heavy, clumped-up fritters instead of delicate ribbons.
Phase 4: The Flash Fry
Heat your oil to 375°F (190°C). When you drop the onions in, they should sizzle violently immediately. Because they are so thin, they will cook in 60 to 90 seconds. Use a spider strainer or slotted spoon to move them around constantly so they brown evenly.
- Visual Cue: Remove them when they are a light golden brown. They will continue to darken slightly and crisp up further as they cool. Drain them immediately on a wire rack over a baking sheet rather than paper towels; paper towels can trap steam and lead to sogginess.
Creative Variations and Customizations
The Spicy Kick
For those who enjoy heat, add 1/2 teaspoon of cayenne pepper and a teaspoon of chili powder to the flour dredge. After frying, dust the hot onions with a pinch of chipotle powder. This version pairs exceptionally well with Beef tacos or a robust chili.
The Mediterranean Twist
Swap the paprika for dried oregano and a touch of lemon zest in the flour. After frying, finish with a sprinkle of sea salt and a dusting of dried sumac. These are incredible when served alongside grilled lamb or folded into a warm pita with hummus.
The Herb-Infused Batch
Finely mince fresh rosemary or thyme and mix it directly into the flour. The heat of the oil will flash-fry the herbs alongside the onions, releasing their essential oils and scenting the entire batch with a rustic, earthy aroma.
Serving and Pairing Suggestions
Tobacco Onions are best served immediately while their structural integrity is at its peak. For a classic presentation, pile them high into a “haystack” in the center of the table.
Side Dish Pairings
They are a natural companion to creamy elements. Serve them alongside a decadent Garlic Mashed Potato or a loaded baked potato with Turkey Bacon bits and chives. The crunch of the onions cuts through the richness of the potato perfectly. They also excel when paired with a fresh arugula salad dressed in a sharp lemon vinaigrette.
Non-Alcoholic Pairings
To complement the salty and smoky notes, consider a Sparkling Verjuice Spritz. Verjuice (the pressed juice of unripened grapes) provides a sophisticated acidity without alcohol. Mix it with soda water and a sprig of fresh mint. Alternatively, a high-quality Smoked Ginger Ale or a tart Pomegranate Mocktail provides a refreshing counterpoint to the fried elements.
Storage, Reheating, and “The Next Day” Magic
While these are best fresh, you can store leftovers in an airtight container at room temperature for up to two days. Avoid the refrigerator, as the humidity will turn them soft.
The Reheating Secret
Never use a microwave. To restore the crunch, spread the onions in a single layer on a baking sheet and place them in a 350°F (175°C) oven for 3 to 5 minutes. They will crisp back up almost perfectly.
Leftover Transformation
If you find yourself with an abundance of leftovers, chop them up and use them as a “flavor dust.” Fold them into an omelet with Chicken Ham and cheese, or sprinkle them over a bowl of hot tomato soup for an instant texture upgrade.
Helpful Pro Tips from the Kitchen
The Temperature Rule: Always use a thermometer. If the oil drops below 350°F, the onions will absorb too much fat and become greasy. If it goes above 400°F, the flour will burn before the onion inside has a chance to soften.
The Batch Method: Patience is a virtue. Frying in small batches prevents the oil temperature from crashing and ensures the onions have enough room to move and curl, which creates that beautiful “tobacco” look.
The Seasoning Window: Salt your onions the second they come out of the oil. The residual surface oil will help the salt crystals adhere. If you wait until they are cool, the salt will simply fall to the bottom of the bowl.
The Professional Recipe Card
Prep Time: 40 minutes (includes soaking) | Cook Time: 10 minutes | Total Time: 50 minutes
Description: These ultra-thin, golden-brown onion ribbons are seasoned with smoked paprika and garlic, then flash-fried to create a delicate, “shatter-crisp” garnish or side dish.
Ingredients
The Onion Base
- 2 large yellow onions, sliced paper-thin (mandoline preferred)
- 1 cup buttermilk (or milk plus 1 tbsp lemon juice)
The Seasoned Dredge
- 1 cup all-purpose flour
- 1 teaspoon smoked paprika
- 1/2 teaspoon garlic powder
- 1/2 teaspoon fine sea salt
- 1/4 teaspoon freshly ground black pepper
For Frying
- 1 quart vegetable or canola oil (for deep frying)
- Extra salt for finishing
Instructions
- Prepare the Onions: Peel the onions and slice them into extremely thin rings using a mandoline or a very sharp knife. Place the rings in a large bowl and separate them with your fingers.
- The Buttermilk Soak: Pour the buttermilk over the onions, ensuring every strand is submerged. Let them sit at room temperature for at least 30 minutes.
- Mix the Coating: In a wide, shallow dish or a gallon-sized freezer bag, whisk together the flour, smoked paprika, garlic powder, salt, and pepper.
- Heat the Oil: Pour the oil into a deep pot or Dutch oven. Heat over medium-high heat until it reaches 375°F (190°C).
- Dredge the Onions: Take a small handful of onions from the buttermilk and let the excess liquid drip off. Toss them in the flour mixture until thoroughly and individually coated. Shake off any excess flour using a mesh strainer.
- Flash Fry: Carefully drop the dredged onions into the hot oil. Use a spider or slotted spoon to keep them moving. Fry for 60 to 90 seconds until they turn a light golden brown and feel crisp.
- Drain and Season: Remove the onions quickly and place them on a wire cooling rack. Immediately sprinkle with a pinch of extra salt while they are still hot.
- Repeat: Work in batches until all onions are fried, allowing the oil to return to 375°F between each batch. Serve immediately.