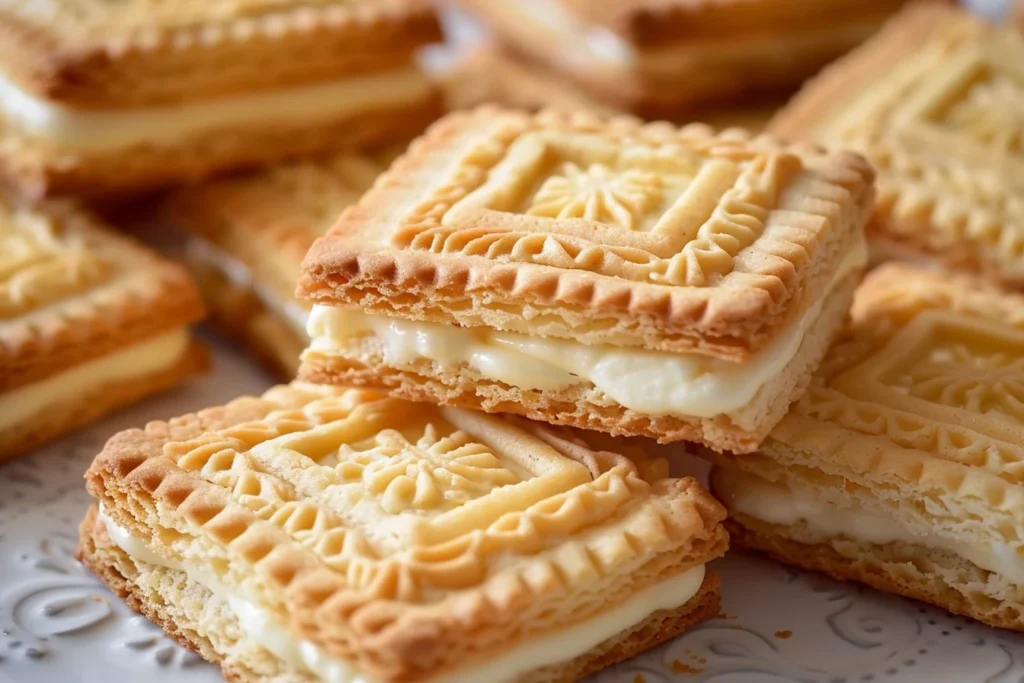
There is a specific, comforting magic that occurs when the scent of vanilla and toasted flour begins to drift from a warm oven. For anyone who grew up with a tin of biscuits nearby, the Custard Cream is more than just a snack; it is a cultural icon. The first time I attempted Mary Berry’s refined version of this classic, the kitchen was transformed into a sanctuary of sweetness. As the butter and sugar creamed together, the pale yellow hue of the custard powder promised a melt-in-the-mouth texture that no store-bought packet could ever hope to replicate.
Taking that first bite of a warm, homemade Custard Cream is a revelation. The biscuit itself possesses a delicate, shortcrust-like snap that immediately gives way to a velvety, buttery center. It is a symphony of textures—the slight crunch of the patterned exterior meeting the luscious, silk-smooth custard buttercream. It evokes memories of rainy afternoons, steaming mugs of tea, and the simple joy of a treat made with patience and high-quality ingredients. This is a recipe that commands you to slow down and savor the craftsmanship of traditional baking.
In the world of British teatime treats, the Custard Cream reigns supreme for its understated elegance. While more modern cookies might rely on flashy inclusions like chocolate chunks or sea salt, this biscuit relies on the purity of its flavor profile: high-fat butter, floral vanilla, and the nostalgic, malty punch of bird’s custard powder. By following this masterclass, you aren’t just baking a cookie; you are preserving a piece of culinary history while elevating it to professional standards that would make even the most discerning judge proud.
Why You Will Love This Dish
Unmatched Textural Sophistication
Unlike commercial biscuits that can often feel sandy or overly hard, these homemade Custard Creams offer a sophisticated “short” texture. The high ratio of fats to flour, combined with the cornflour-based custard powder, ensures that the biscuit dissolves beautifully on the tongue. This recipe achieves the perfect balance between a sturdy structure that holds its shape and a delicate crumb that feels luxurious with every bite.
A Customizable Canvas for Flavor
While the classic vanilla-custard profile is legendary, this recipe serves as a brilliant foundation for experimentation. Because the base dough is so stable and reliable, you can easily pivot the flavor profile to suit your mood or the season. Whether you want to lean into citrus notes or deepen the warmth with spices, the structural integrity of Mary Berry’s ratio remains intact, making it a favorite for adventurous home bakers.
The Ultimate Crowd-Pleaser
There is a universal appeal to the Custard Cream that transcends generations. Children love the sweetness and the fun of “sandwiching” the biscuits together, while adults appreciate the nostalgic flavor and the way it complements a robust cup of coffee or Earl Grey tea. It is a sophisticated addition to a dessert platter or a charming gift when tucked into a parchment-lined tin, offering a personal touch that far outweighs any store-bought alternative.
What Makes This Recipe Special
The brilliance of Mary Berry’s approach to the Custard Cream lies in the precision of the ingredient ratios and the specific mixing method. Most standard recipes produce a biscuit that is either too tough or too fragile to handle the filling. This recipe utilizes a “creaming and folding” technique that incorporates just enough air to keep the biscuit light without causing it to spread uncontrollably in the oven.
Furthermore, the inclusion of instant custard powder within both the biscuit dough and the filling creates a double layer of flavor. In many basic recipes, the custard flavor is an afterthought, relegated only to the cream. Here, the biscuit itself is infused with that signature malty sweetness and a beautiful golden tint. This creates a cohesive tasting experience where the shell and the core work in harmony rather than competing for dominance. The result is a biscuit that looks professional, tastes artisanal, and holds its iconic embossed patterns with remarkable clarity.
Ingredient Essentials and The Science of Flavor
The Fat: Unsalted Butter
The soul of this biscuit is high-quality unsalted butter. Butter provides the “short” texture by coating the flour particles and preventing the development of long gluten strands. Using unsalted butter allows you to control the seasoning precisely. If you must use salted butter, omit any additional salt, though unsalted is preferred for the cleanest vanilla flavor.
The Secret Weapon: Instant Custard Powder
Custard powder is essentially flavored cornflour (cornstarch). In baking science, replacing a portion of the flour with cornflour weakens the gluten structure, resulting in a more tender crumb. It also provides the distinct yellow color and the unique “custard” aroma that characterizes this biscuit. Ensure you use “instant” or “original” powder, not the ready-to-use liquid version.
The Flour: Plain (All-Purpose) Flour
Plain flour is essential here. We want a low protein content to ensure the biscuits remain crisp and delicate. Self-rising flour would add leavening agents that would cause the biscuits to puff up and lose their traditional flat, rectangular shape and stamped patterns.
Substitutions and Variations
- Gluten-Free: You can substitute the plain flour with a high-quality 1:1 gluten-free flour blend. Ensure the blend contains xanthan gum to help the dough hold together. The texture will be slightly crispier but equally delicious.
- Vegan Option: Use a high-fat vegan butter block (not a spread) and a splash of oat or almond milk. Ensure your custard powder is vegan-friendly, as some brands contain milk solids.
- Pantry Staple Hack: If you run out of icing sugar for the filling, you can blend granulated sugar in a high-speed blender until it reaches a fine powder, though the texture may be slightly less silken than commercial icing sugar.
The Masterclass: Step-by-Step Narrative
Phase 1: The Dough Foundation
Begin by creaming the softened butter and caster sugar together. You are looking for a pale, fluffy consistency. This process incorporates tiny air bubbles that will expand slightly in the oven, providing lightness. Once the butter and sugar are unified, beat in the vanilla extract and the milk. The milk acts as a binder, ensuring the dough isn’t too crumbly to roll.
Visual Cues: The mixture should look like thick whipped cream. If the butter is too cold, it will remain lumpy; if too warm, it will look greasy. Aim for “cool room temperature” butter.
Common Pitfall: Over-beating after adding the flour. Once the flour and custard powder are added, mix only until a cohesive dough forms. Over-working at this stage develops gluten, leading to a hard, “bready” biscuit.
Phase 2: Shaping and Chilling
Turn the dough out onto a lightly floured surface. Roll it out to a consistent thickness of about 5mm. Using a rectangular cutter (or the traditional Custard Cream stamp), cut out your biscuits. If you don’t have a stamp, you can create the classic diamond pattern by gently pressing a fork or the back of a knife into the surface in a criss-cross motion.
Visual Cues: The dough should feel supple and not stick to your hands. If it feels too soft, wrap it in cling film and chill for 20 minutes before rolling.
Common Pitfall: Skipping the chill. If the biscuits go into the oven warm, the butter will melt too fast, causing the patterns to disappear and the edges to spread. Always chill the trays for 10-15 minutes before baking.
Phase 3: The Golden Bake
Place the biscuits on lined baking sheets, leaving about 2cm of space between them. Bake at 180°C (350°F) for 12–15 minutes. You aren’t looking for a deep brown color; the biscuits should be a pale, sandy gold. They will feel slightly soft to the touch when they first come out but will firm up as they cool on the wire rack.
Phase 4: The Velvety Filling
While the biscuits cool completely, prepare the custard buttercream. Sift the icing sugar and custard powder to remove any lumps. Beat the softened butter until extremely pale, then gradually add the dry ingredients and vanilla. The result should be a stiff yet spreadable frosting that holds its shape.
Creative Variations and Customizations
The Citrus Twist
For a bright, summery version, add the zest of two lemons to the biscuit dough and replace the vanilla in the filling with a teaspoon of fresh lemon juice. The acidity cuts through the richness of the butter, creating a refreshing “Lemon Custard Cream.”
The Spiced Warmth
Incorporate 1 teaspoon of ground ginger and a pinch of cardamom into the flour mixture. This adds a sophisticated heat to the biscuit that pairs exceptionally well with a hot chai or a dark roast coffee. The ginger complements the maltiness of the custard powder beautifully.
The Cocoa Contrast
Replace 30g of the plain flour with high-quality cocoa powder. This creates a striking “Chocolate Custard Cream.” The dark, slightly bitter shell provides a stunning visual and flavor contrast to the bright yellow custard filling.
Serving and Pairing Suggestions
To serve these in a professional manner, stack them neatly on a white ceramic platter or a tiered cake stand. For a modern aesthetic, serve them alongside a small bowl of fresh raspberries; the tartness of the berries cleanses the palate between bites of the rich biscuit.
For pairings, focus on non-alcoholic beverages that complement the vanilla profile. A chilled glass of sparkling apple cider (non-alcoholic) provides a crisp contrast. Alternatively, a “Vanilla Bean Mocktail” made with sparkling water, a dash of alcohol-free vanilla syrup, and a squeeze of lime offers a sophisticated, bubbly accompaniment that mirrors the flavors in the biscuit.
Storage, Reheating, and The Next Day Magic
Custard Creams are remarkably hardy. Store them in an airtight container at room temperature for up to 7 days. Interestingly, they often taste better on the second day, as the moisture from the filling softens the inner surface of the biscuit slightly, creating a more integrated texture.
If the biscuits lose their “snap” due to humidity, you can place the un-filled shells in a 150°C (300°F) oven for 5 minutes to re-crisp them. Once cooled, proceed with the filling. You can also freeze the un-filled biscuits for up to 3 months. Simply thaw and fill when ready to serve.
Helpful Pro Tips from the Kitchen
The Temperature Rule: Ensure your butter for the filling is truly soft—nearly the consistency of mayonnaise—before adding the icing sugar. This prevents “grainy” frosting and ensures the filling is light and aerated.
Precision Rolling: Use rolling pin guide rings or two flat wooden skewers placed on either side of your dough to ensure every biscuit is exactly 5mm thick. Uniform thickness ensures uniform baking times.
The Sift is Essential: Never skip sifting the icing sugar or custard powder. Both are prone to clumps that are nearly impossible to beat out once combined with butter, and a lumpy filling ruins the professional finish of the biscuit.
The Professional Recipe Card
- Prep Time: 30 minutes
- Cook Time: 15 minutes
- Total Time: 45 minutes (plus cooling)
Description: An authentic, professional-grade recreation of the classic British Custard Cream. These biscuits feature a short, melt-in-the-mouth crumb infused with custard powder, sandwiched together with a rich, velvety custard buttercream.
Ingredients
For the Biscuits:
- 225g unsalted butter, softened
- 115g caster sugar
- 1 tbsp vanilla extract
- 3 tbsp milk
- 340g plain flour, sieved
- 125g instant custard powder
For the Filling:
- 300g icing sugar, sieved
- 150g unsalted butter, softened
- 1 heaped tbsp instant custard powder
- 2 tsp vanilla extract
Instructions
- Cream the Base: In a large bowl or stand mixer, beat the 225g of softened unsalted butter and 115g of caster sugar until the mixture is pale, light, and fluffy.
- Add Aromatics: Incorporate the 1 tbsp of vanilla extract and 3 tbsp of milk, beating until just combined.
- Incorporate Dry Ingredients: Gently fold in the sieved 340g of plain flour and 125g of instant custard powder. Mix until a soft dough forms. Do not over-work.
- Chill and Roll: Wrap the dough in cling film and chill for 20 minutes. On a lightly floured surface, roll the dough to a thickness of 5mm.
- Cut and Pattern: Cut the dough into small rectangles. Use a biscuit stamp or the back of a fork to create the traditional pattern.
- The First Bake: Place on a lined baking tray and bake at 180°C (350°F) for 12–15 minutes until pale golden. Transfer to a wire rack to cool completely.
- Prepare Filling: Beat the 150g of softened butter for the filling until very smooth. Gradually add the 300g of sieved icing sugar, 1 heaped tbsp of custard powder, and 2 tsp of vanilla extract. Beat until stiff and creamy.
- Assemble: Once the biscuits are completely cold, pipe or spread a generous layer of filling onto the flat side of one biscuit and top with another, pressing gently to secure.