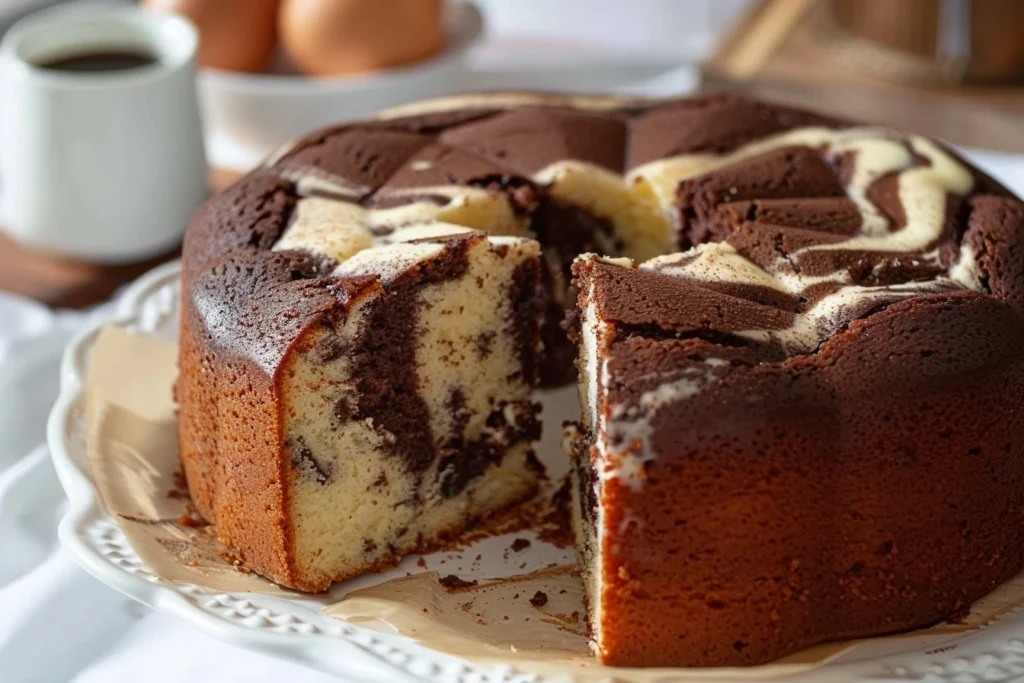
Finding a dessert that balances visual appeal with an incredible texture can be a challenge, especially when navigating the world of gluten-free baking. The Gluten-Free Marble Cake is a timeless classic that brings together the best of two worlds: velvety vanilla and rich, deep chocolate. This cake is not just a substitute for traditional recipes; it is a premium dessert in its own right, offering a moist crumb that defies the common stereotype of dry or crumbly gluten-free treats.
This recipe has gained immense popularity among home bakers because it provides a sophisticated look with relatively simple techniques. Whether you are hosting a formal tea party or looking for a comforting weekend bake, this marble cake delivers a nostalgic experience without the digestive discomfort associated with wheat-based flours. Its striking contrast of light and dark batter makes every slice a unique piece of edible art.
What Is Gluten-Free Marble Cake?
A Gluten-Free Marble Cake is a dual-flavored sponge cake created by lightly swirling two different colored batters together. Unlike a layered cake where flavors remain separate, the marbling technique integrates vanilla and chocolate in a way that allows you to taste both in a single bite. The primary difference between this and a standard marble cake lies in the structural foundation of the batter.
In traditional baking, gluten provides the elasticity and “stretch” that holds the cake together. In this gluten-free version, we rely on a carefully balanced blend of alternative flours, often including rice flour, potato starch, and tapioca starch, along with leavening agents like baking powder and baking soda. To compensate for the lack of gluten, this recipe utilizes sour cream and butter to ensure the moisture levels remain high, resulting in a dense yet soft crumb that mimics a high-end pound cake.
Why You’ll Love This Recipe
Exceptional Moisture Levels
Many gluten-free cakes suffer from a gritty or dry texture. This recipe solves that issue by incorporating sour cream and softened butter. These fats coat the flour particles and provide a creamy mouthfeel that lasts for days, even after the cake has cooled completely.
Simple Ingredients
You do not need an exotic pantry to make this masterpiece. Most of the components are pantry staples. By using a pre-mixed gluten-free flour blend, you avoid the complexity of measuring out individual starches and gums, making this accessible for beginners.
Visual Wow Factor
The swirling process is incredibly satisfying and yields a professional-looking result every time. It is a foolproof way to impress guests without needing advanced cake decorating skills or expensive equipment.
Versatile Flavor Profile
While vanilla and chocolate are the stars here, the base batter is incredibly adaptable. It serves as a perfect canvas for various extracts or zests, allowing you to customize the flavor to suit your specific cravings or the season.
Flavor Profile Breakdown
The flavor profile of this Gluten-Free Marble Cake is defined by balance. The vanilla portion offers a clean, sweet, and aromatic base that highlights the quality of the butter and eggs. It provides a light, airy contrast to the chocolate sections.
The chocolate swirl introduces a sophisticated bitterness and a deeper, more robust earthiness. Because we use cocoa powder bloomed in hot water, the chocolate flavor is intensified, providing a fudgy quality that cuts through the sweetness of the granulated sugar.
In terms of texture, expect a tight, fine crumb. It is sturdy enough to hold its shape when sliced but tender enough to melt on the tongue. The aroma is a comforting blend of toasted sugar, warm vanilla, and dark cocoa, which fills the kitchen beautifully as it bakes.
Ingredient Breakdown
Gluten-Free Flour Blend
The foundation of the cake. For the best results, use a “measure-for-measure” or “1-to-1” blend that already contains xanthan gum. This gum acts as a binder, replacing the structural role of gluten and preventing the cake from falling apart.
Baking Powder and Baking Soda
These are your leavening agents. Baking powder provides the initial lift in the oven, while baking soda reacts with the acidity in the sour cream to create a tender texture and help with browning.
Unsalted Butter
Softened butter is essential for the creaming process. When beaten with sugar, it traps air bubbles that expand during baking, contributing to a lighter cake. Using unsalted butter allows you to control the exact salt content of the recipe.
Granulated Sugar
Beyond sweetness, sugar helps with moisture retention and provides the structural integrity needed for a tall rise.
Large Eggs
Eggs act as the primary emulsifier and provide structure. They help bind the fats and liquids with the flour blend, ensuring the cake doesn’t become too crumbly.
Vanilla Extract
Always use pure vanilla extract if possible. It enhances both the chocolate and the vanilla batters, acting as a flavor bridge between the two.
Sour Cream
This is the “secret” ingredient for moisture. The fat content adds richness, while the acidity tenderizes the proteins in the flour and eggs. If you don’t have sour cream, full-fat Greek yogurt is an excellent substitution.
Milk
Milk thins the batter to the perfect dropping consistency. You can use whole milk for richness or a non-dairy alternative like almond or soy milk if you prefer a dairy-free profile.
Cocoa Powder and Hot Water
The cocoa powder provides the chocolate element. Mixing it with hot water (blooming) helps dissolve the cocoa solids and releases the full depth of the chocolate flavor, ensuring there are no dry clumps in your swirl.
Step by Step Cooking Tips
Creaming the Butter and Sugar
The first step of beating the butter and sugar is where you build the cake’s volume. Do not rush this. You want the mixture to look pale and fluffy. This mechanical aeration is what prevents a gluten-free cake from being heavy and leaden.
Blooming the Cocoa
Always mix your cocoa powder with the hot water before adding it to the batter. This ensures the chocolate flavor is evenly distributed and prevents the chocolate portion of the cake from being drier than the vanilla portion.
The Gentle Swirl
When combining the two batters in the pan, less is more. Use a butter knife or a skewer to create a figure-eight pattern. If you over-mix, the colors will blend into a muddy light brown instead of distinct, beautiful swirls.
Room Temperature Ingredients
Ensure your eggs, milk, and sour cream are at room temperature. Cold ingredients can cause the butter to seize, leading to an uneven batter and a grainier texture in the finished cake.
Variations and Customizations
Protein and Dairy Swaps
If you need to avoid dairy, replace the butter with a high-quality vegan butter stick and use a coconut-based sour cream. The gluten-free flour blend will still perform well with these substitutions.
Spice Infusions
Add a teaspoon of cinnamon to the chocolate batter for a Mexican-inspired twist, or add some orange zest to the vanilla batter to create a bright, citrusy contrast to the rich cocoa.
Add-Ins
For extra texture, you can fold in a half-cup of mini chocolate chips or finely chopped walnuts. Just ensure they are tossed in a tiny bit of gluten-free flour first so they don’t sink to the bottom of the pan.
Mocha Version
Replace the two tablespoons of hot water with two tablespoons of strong brewed espresso to turn the chocolate swirl into a mocha swirl.
Common Mistakes to Avoid
Over-Baking
Gluten-free cakes can dry out quickly if left in the oven too long. Start checking for doneness five minutes before the timer goes off. A toothpick should come out with a few moist crumbs, not completely bone-dry.
Using the Wrong Flour
Avoid using single-grain flours like just coconut flour or just almond flour for this recipe. They absorb moisture differently and will not provide the necessary structure. Stick to a balanced multi-purpose gluten-free blend.
Aggressive Swirling
If you stir the batter too much once it is in the pan, you will lose the “marble” effect. Limit yourself to three or four passes with your knife.
How to Store and Reheat Leftovers
To keep your Gluten-Free Marble Cake fresh, wrap it tightly in plastic wrap or store it in an airtight container at room temperature for up to three days. Because gluten-free flours can harden faster than wheat, you can also store slices in the refrigerator for up to a week.
For long-term storage, this cake freezes beautifully. Slice the cake first, wrap individual pieces in parchment paper, and place them in a freezer bag. They will stay fresh for up to three months. To reheat, simply let a slice come to room temperature or give it a quick 15-second zap in the microwave to restore that “just-baked” softness.
Recipe Card
Prep Time: 20 minutes
Cook Time: 45 minutes
Total Time: 1 hour 5 minutes
Description
A moist and tender gluten-free marble cake featuring elegant swirls of rich chocolate and aromatic vanilla. This recipe uses sour cream for ultimate moisture and a simple gluten-free flour blend for a perfect crumb.
Ingredients
- 1 1/2 cups gluten-free flour blend
- 1 teaspoon baking powder
- 1/2 teaspoon baking soda
- 1/4 teaspoon salt
- 1/2 cup unsalted butter, softened
- 1 cup granulated sugar
- 2 large eggs
- 1 teaspoon vanilla extract
- 1/2 cup sour cream
- 1/2 cup milk (or any non-dairy milk)
- 1/4 cup cocoa powder
- 2 tablespoons hot water
Instructions
- Preheat your oven to 350°F (175°C) and grease a 9-inch loaf pan or line it with parchment paper.
- In a medium bowl, whisk together the gluten-free flour blend, baking powder, baking soda, and salt.
- In a large mixing bowl, cream the softened butter and granulated sugar together until light and fluffy.
- Add the eggs one at a time, beating well after each addition, then stir in the vanilla extract.
- Gradually add the dry ingredients to the wet ingredients, alternating with the milk and sour cream. Begin and end with the flour mixture.
- In a small separate bowl, whisk the cocoa powder and hot water together until a smooth paste forms.
- Transfer about one-third of the plain vanilla batter into the bowl with the cocoa paste and fold gently until fully combined.
- Drop spoonfuls of the vanilla batter and chocolate batter into the prepared loaf pan in an alternating pattern.
- Use a knife to gently swirl the batters together to create the marble effect.
- Bake for 45 to 50 minutes, or until a toothpick inserted into the center comes out clean.
- Allow the cake to cool in the pan for 10 minutes before transferring it to a wire rack to cool completely.